So I recently came across a browser specification called Payment Request API. Its rare to come across a totally new api while browsing the internet, so I decided to look into it. Here is the link to the Editor’s Draft for this specification in case it has piqued your interest.
Reading the Editor’s draft is confusing and tough. I am just glad that the chrome dev team wrote a really good documentation on this technology and how to use it.
At the time of writing of this article, chrome 60 is due release, but the PaymentRequest API is supported on chrome canary. So the demo has been tested on chrome canary and no other browser. So without any further delay, here is the demo.
See the Pen Payment Request API DEMO by Prateek Jadhwani (@prateekjadhwani) on CodePen.
Explanation
Coming back to the explanation of what I have done in the demo, if you are familiar wiht online payment, then it will be really easy for you to understand. Every checkout process requires three things, type of payment and payment information, the total amount (with tax, discount, shipping etc) and optional information like shipping, phone number, etc. And the good thing is, the Payment request API requires these three things in the form of three different parameters as objects.
Payment information
This is the way you can ask the payment Request API to support any payment card (credit or debit)
const supportedPaymentMethods = [
  {
    supportedMethods: ['basic-card']
  }
];
And this is the way you can limit the payment method to just visa and mastercard
const supportedPaymentMethodsTwo = [
  {
    supportedMethods: ['basic-card'],
    data: {
      supportedNetworks: ['visa', 'mastercard'],
      supportedTypes: ['credit'],
    },
  }
];
You can also add another type of payment systems like paypal or android pay. This link is helpful in configuring, but the process is same
Total Amount Information
You can provide the amount information in the following way
const paymentDetails = {
  total: {
    label: 'Total',
    amount: {
      currency: 'USD',
      value: 0
    }
  }
};
And you can add more information like shipping, tax etc in the following way
const paymentDetails = {
  total: {
    label: 'Total',
    amount: {
      currency: 'USD',
      value: 0
    }
  },
  displayItems: [
    {
      label: 'Shipping Cost',
      amount: {
        currency: 'USD',
        value: 5.75
      }
    },
    {
      label: 'Tax',
      amount: {
        currency: 'USD',
        value: 0.75
      }
    },
  ]
};
Extra Options
You can ask for more options from the user here in this object. You can either leave it blank or you can add the things that you require for the payment.
const options = {};Or let’s say you want shipping information, you can go with this.
const optionsThree = {
  requestShipping: true
};
Getting the PaymentRequest Object
Once you are done creating the object for payment information, amount and options, you can create a PaymentRequest Object by passing them in the following way
const request = new PaymentRequest(
  supportedPaymentMethods,
  paymentDetails,
  options
);
Thats it!!!
Now lets say you have a Pay button and when the user clicks on it, it should let the users enter the payment information. So you can add an event listener on that button that would execute the show method of PaymentRequest API
This is how it can be done.
document.querySelector('.pay1').addEventListener('click', () => {
  request.show();  // this is a promise
});
Just remember that show() method returns a promise so it needs to be handled correctly in the following way
document.querySelector('.pay1').addEventListener('click', () => {
request1.show()
.then((response) => {
// do stuff
})
.catch((e) => {
console.log(e);
});
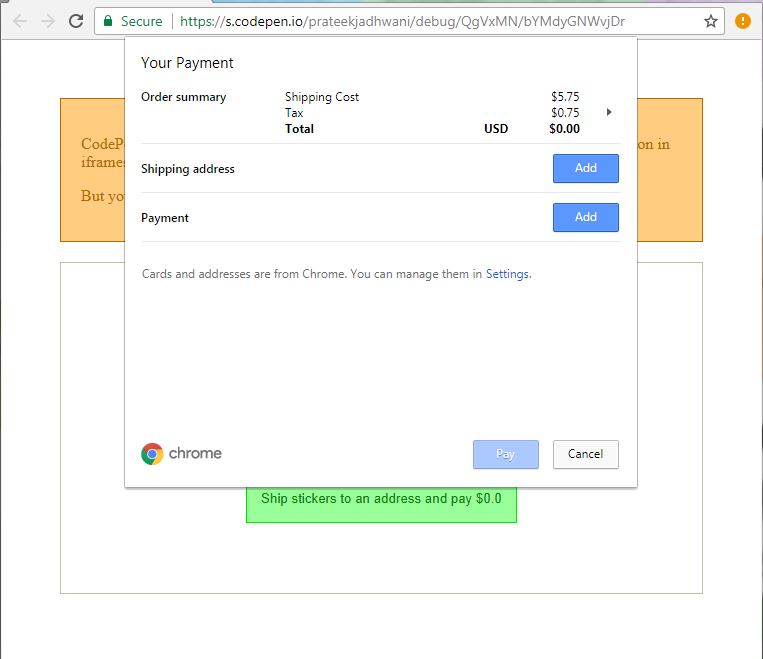
});So, now, clicking on the button will show up the pay dialog box where user can enter the details as shown in the screenshot below. After entering correct information, the flow goes into the then() block and when anything goes wrong, or if the user clicks on the cancel button, it goes to the catch block.
To close the payment dialog you can use the complete() method as shown in the then() block
document.querySelector('.pay1').addEventListener('click', () => {
  request1.show()
  .then((response) => {
    // do backend stuff
    console.log(response);

    //close the payment ui
    return response.complete()
  })
  .catch((e) => {
    console.log(e);
  });
});
Conclusion
This is a fairly new technology / specification and is continuously improving. But it takes care of a lot of things by simply moving everything in the browser layer. And in terms of code, it is fairly easy to implement. But feel free to look through the demo and source code if yo have any questions and/or concerns.